Safe Cooking Techniques for Cooks Who Are Blind or Have Low Vision
Safe Cooking Tips
- Wear short sleeves or roll your sleeves above the elbow when working at the stove.
- Wear oven mitts to handle pots and pans.
- Set a timer to remind you when to turn off the stove and electrical appliances.
| To make chopping easier and safer, use a flexible-arm task lamp for extra light, a cutting board with an attached pivot knife for safety, and a white cutting board that contrasts with the red apple. | 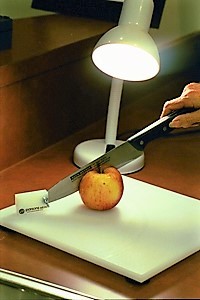 |
- Make sure all your appliances are in good working order and avoid overloading circuits.
- Use a vegetable peeler instead of a knife for peeling fruits and vegetables.
- Don’t store spices on a shelf above the stove, choose a lower shelf or drawer.
- Always turn off the gas flame before you remove a pan from the burner.
- Don’t wear clothing with long, loose sleeves when cooking.
Cutting and Chopping
- Use trays or cutting boards in colors that contrast with your food. For example, keep a white cutting board for slicing apples or carrots, and a dark-colored board for onions.
 | Use a light colored cutting board for darker-colored foods, such as eggplant or broccoli, and a darker one for lighter-colored foods, such as onions and cheese. |
- Make sure the cutting edge of your knife blade is facing downward before you cut or slice. You can identify the cutting edge of the knife blade without touching it. Since the cutting edge is usually curved, try rocking the knife blade forward and backward on the table top to determine when the cutting edge (which will rock) is facing downward.
- Try using a pizza cutter instead of a knife for slicing sandwiches.
- You can find more information and adaptations at Hints for Easier Eating and Pouring.
Measuring
- Hold a light-colored measuring cup against a darker background when pouring milk, flour, sugar, and other light-colored ingredients.
| Measuring cups and spoons are available with large print, tactile, and contrasting markings. | 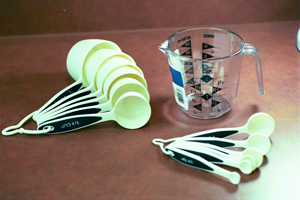 |
- Use a measuring cup with raised numbers on the side or mark the cup with a 3-D pen, such as a Hi-Mark Tactile Pen or a Spot ‘n Line Pen: a 3-D plastic liquid that makes raised lines, dots, and shapes to identify clothing, canned goods, frozen foods, and mark the settings on appliances.
- Use individually-sized or stacking measuring cups to scoop desired amounts.
- Measure spices into your hand first to avoid pouring into a spoon (some spice containers have a wide opening to insert a spoon), or use measuring spoons with large numbers.
Pouring
Cold Liquids
Again, use color contrasts: dark pitchers and servers for milk and other light-colored liquids, a white pitcher for dark liquids, such as iced tea.
When pouring into a glass:
- Locate the pitcher by trailing your hand along the table.
- Locate the spout by moving your hand up the pitcher, and then turn the pitcher until the spout faces the glass.
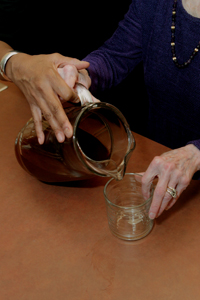 | When pouring cold liquid into a glass, your finger placed over the edge of the glass can serve as a guide to help you know when the glass is almost full. |
- With your other hand, move the glass toward the pitcher, keeping your index finger on the spout of the pitcher.
- Lift the pitcher slightly and touch the spout to the rim of the glass.
- Now hook your index finger over the rim of the glass so that just your fingertip is inside the glass.
- Pour until you can feel the water or other liquid reach your index finger. Also, listen for sound changes as liquid reaches the top of the glass.
- You can also try pouring with the pitcher in the sink and the glass or cup on the adjoining counter top. This can make it easier to lift the pitcher or kettle and can help with spills and cleanup.
- Try practicing with empty containers first, and pour over a tray to catch any spills.
- You can find more information and adaptations at Hints for Easier Eating and Pouring.
Electronic Devices for Pouring
You may prefer to use an electronic liquid level indicator, also known as a “Say When.” This battery-operated device is placed at the top of a cup or glass and beeps when the liquid reaches the top.
| The “Say When” electronic device can also be used when filling a cup from a water dispenser. | 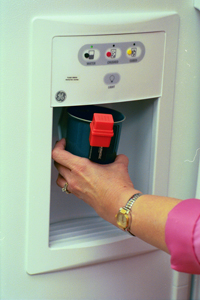 |
Hot Liquids
- The Sunbeam Hot Shot Beverage Maker heats 12 ounces of water in about 90 seconds at the touch of a button. It makes piping hot water for coffee, cereals, soups, cocoa, or tea.
- Microwave one cup of water for two and one-half minutes.
- Pre-measure the desired quantity of water and pour it through your automatic coffee maker with the filter basket in place.
- Fill a kettle with the desired amount of water (one cup, for example) before heating and pouring.
- Use an electronic liquid level indicator.
- You can find more information and adaptations at Hints for Easier Eating and Pouring and Household, Personal and Other Independent Living Products.
Peeling
- Use a vegetable peeler rather than a knife. Hold the fruit or vegetable in one hand; the peeler in the other.
- Grasp the handle with your thumb on one side and your fingers on the other. Don’t touch the moving rod inside the peeler.
- Hold the item at a 45-degree angle and, working on one half of the fruit or vegetable, start to peel on the surface, away from your body. Once the peelings have been removed, check the section with your index finger to feel if it is smooth.
- Peel until the half you’re working on is finished. Then flip the food item so that the unpeeled portion is facing downward and continue peeling.
- To determine whether you have any peel left, run cold water over the fruit or vegetable and feel the surface with your fingertips.
Placing Pans on a Burner
- Always position the pan correctly on the burner before turning the stove on.
- Always turn off the burner before removing the pan.
- Flat surface stoves can be problematic, but some have tactile contrast to indicate the burner. Again, never turn on a burner until your pan is in position. See Considerations for Using a Flat Top Stove after Vision Loss for additional hints on centering a pan.
- Check the evenness of heat around the pan by holding your palm at chest level and circling your hand to determine the location of the heat source.
- You can check and adjust the position of the pan on the burner using a wooden spoon.
- Make sure the handles on the pots and pans and knobs on the lids are heat resistant.
- Make sure the handles are turned in when cooking so you will not accidentally bump or knock your pots and pans to the floor. Also be sure that the handle of the pan is not protruding over another burner.
Baking
- Make sure the oven racks are positioned correctly before turning on the oven.
- Always turn off the heat before removing items from the oven.
- When removing items, pull the oven rack partially out rather than reaching into the oven. Remember to push the rack back in and close the oven door as soon as possible after placing the item on a counter or other surface.
- Use Cool Touch Oven Rack Guards to prevent burning your arms when reaching into the oven.
- Use long heat-proof oven mitts to remove items from the oven.
 | Long heat-proof oven mitts protect hands and arms. |
- Know where you are going to place the hot item before removing it from the oven.
- Oven doors that open down are safer than ones that open to the side.
- Always use an audible timer when baking.
- You can find more information and adaptations at Helpful Products and Technology for Living with Vision Loss – VisionAware.
Turning Foods
It is generally easier to use a double spatula as a turning device:
- Slide the item to the side of the pan, then slide the spatula underneath it.
- With the spatula, move the item to the center of the pan before flipping it over.
- Make sure you have one hand on the handle of the pan to prevent tipping.
Testing Food for Doneness
If you were a seasoned cook before experiencing vision loss, you most likely relied on many techniques to determine when something was “done”—certainly not sight alone. So, while food timers and talking thermometers and other devices will help you compensate for vision loss in the kitchen, you can also learn to lean more heavily on skills and senses you’ve probably been using for years:
- Use touch (carefully) to determine when a cake has finished baking, or use the toothpick test—insert a toothpick in the cake, and if you feel batter sticking to the toothpick, the cake is not yet done.
- Listen for French fries to stop sputtering in their oil to know when they’re done.
- Many foods smell a certain way when cooked. Learn to recognize the signals your other senses are sending you.
Spreading
- Practice with toast—it won’t tear as easily as regular bread.
- With thick spreads like peanut butter or margarine, use an organized pattern to spread outward from a certain point—left to right, top to bottom, or center to outside.
- You can touch the food to make sure that spreading is complete.
- Some people find it easier to spread with the back of a spoon instead of a knife.
Adapting Cookbooks and Recipes
- Cookbooks are available in braille, large print, and recorded versions.
- If you have a computer and a printer, your own recipes can be typed and printed in as large a font as you need. Or they can be handwritten in large print with a bold line marker.
- A flexible-arm task lamp and a reading stand can help position your reading material.
- Sometimes a transparent yellow acetate overlay can make print easier to read.
- Low vision devices, such as magnifiers, task lighting and reading stands, and electronic and digital magnifiers can also help you read your cookbooks and recipes.
Useful Tools and Small Appliances
There are many simple, inexpensive tools you may find helpful in the kitchen. For additional information on where to purchase products check out Helpful Products and Technology for Living with Vision Loss – VisionAware.
- long oven mitts
- kitchen timer with raised markings or large print
- liquid-level indicator
- safety food turner (double spatula)
- splatter shield
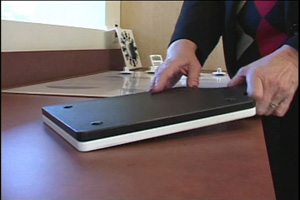
- cutting board with food chute for pouring
- cutting boards in light and dark colors to contrast with food
- color-coded or high-contrast measuring cups and spoons
- individual measuring cups and spoons (a must)
- large-print and broad handle measuring cup
- adjustable knife with a slice guide for adjusting slices
- A 3-D pen (or Hi Marks) for marking appliances
- card and bar code reader for creating labels that can be read back
- boil control disc to keep foods from boiling over
- tomato and vegetable slicer