If you’re taking up embroidery or needlepoint again after losing your vision, be sure to give yourself time to practice and learn to use feedback from your sense of touch. Start slowly with simpler items and move on to more difficult projects as your confidence builds. The following suggestions can help you start embroidering again:
Getting Started and Organizing Your Work Area
- Check the lighting. If you have low vision, make sure that the lighting in your work area provides sufficient illumination. You can read more about lighting at Home Modifications. A lamp with an adjustable flex-arm or gooseneck is usually a good choice because you can adjust the direction of the light as needed. Some lamps also have built in magnifiers.
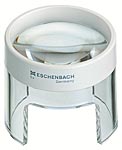
- Use a low vision device. Talk with your eye doctor or low vision specialist to determine if a low vision device that will keep both your hands free, such as a chest or around-the-neck magnifier or a magnifier mounted on a flexible gooseneck stand, could be helpful for knitting. For more information about low vision devices and training, see What Is A Low Vision Examination? and Low Vision Optical Devices.
- Use light/dark contrast. Use a contrasting background, such as a light or dark cloth draped over your lap, to help you see and locate your working area. Create contrasting work areas by using light and dark non-skid shelf liner, placemats, or plastic table covers.
Tips To Help with Embroidery and Needlepoint
- For tips and techniques to help with threading embroidery needles, see Sewing Tips If You’re Blind, Visually Impaired, or Have Low Vision.
- Enlarge your instructions or patterns on a photocopier, record them on cassette, or use a closed circuit television (CCTV) or video magnifier.
- Commercial embroidery kits are now available with larger patterns and canvas sizes.
- Use a needlework hoop to contain your work. A stand-mounted hoop will keep your hands free and allow you to check your work with a chest or around-the-neck magnifier, or a magnifier mounted on a flexible gooseneck stand.
- You could also switch to freeform hand work. To keep freeform embroidery stitches uniform, use smaller-sized hoops for the pattern and move the hoop along as you work.
- Separate your yarns and threads by using Ziploc bags. Label each bag with a large print or braille labels. Use large bold print with easy-to-understand abbreviations made with a wide-tipped felt marker, or a tactile marking in braille. For additional hints about labeling your yarn and knitting supplies, see Labeling and Marking for People Who are Blind or Have Low Vision.
- Keep each embroidery project (thread, needles, and pattern) together in its own bag or container.
Additional Embroidery Links and Resources

